In the digital era, the integration of AI-powered chatbots into various platforms has become a common practice. Among these, ChatGPT, developed by OpenAI, stands out for its natural language processing capabilities. While using the standard ChatGPT through OpenAI’s interface is straightforward, creating a Custom ChatGPT app tailored to your specific needs can be an exciting venture. This guide will walk you through the process of developing your own custom ChatGPT application, allowing you to integrate it into your website or application, all for free.
Introduction to Custom ChatGPT
Custom ChatGPT refers to the process of tailoring the functionalities of the ChatGPT model to suit specific requirements. This includes training the model on domain-specific data, modifying its behavior, and integrating it into your platform.
Setting Up the Development Environment
Before diving into the code, ensure you have Python installed on your machine. Additionally, creating a virtual environment for this project is recommended to manage dependencies efficiently. Use the following commands in your terminal
# Create a virtual environment
python -m venv custom_chatgpt_env

# Activate the virtual environment (for Windows)
custom_chatgpt_env\Scripts\activate

# Activate the virtual environment (for MacOS/Linux)
source custom_chatgpt_env/bin/activate
Obtaining API Keys and Necessary Libraries
To create a custom ChatGPT application, you’ll need the OpenAI API key. If you don’t have one, sign up for an OpenAI account and generate your API key. Once obtained, set the API key as an environment variable
import os
os.environ["OPENAI_API_KEY"] = "YOUR_OPENAI_API_KEY_HERE"
Additionally, ensure you have the required libraries installed. Use pip to install the necessary Python packages
pip install openai langchain
Building the Custom ChatGPT Application
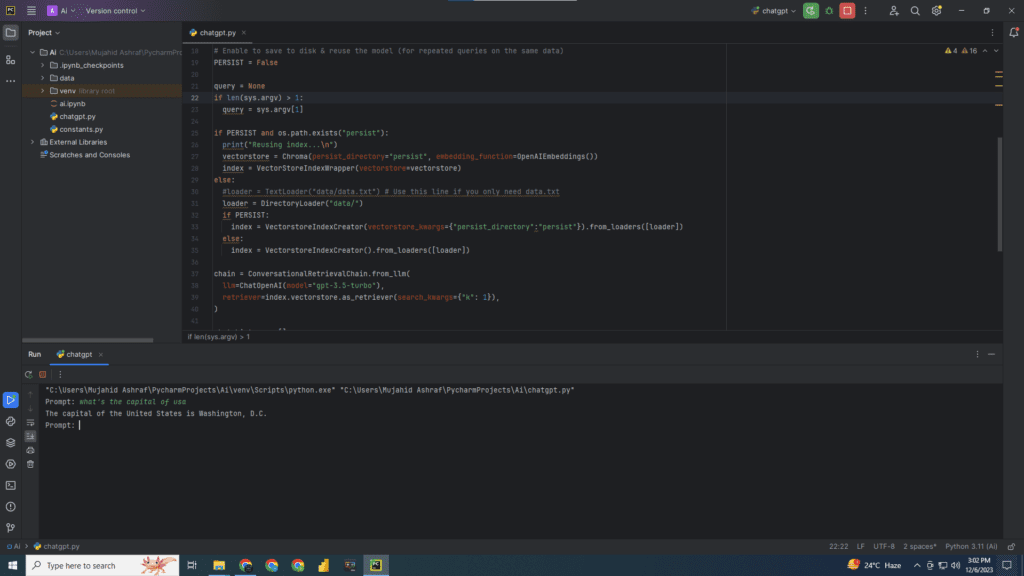
The provided Python script showcases the creation of a custom ChatGPT application using the LangChain library, integrating with OpenAI’s GPT-3.5 model. Here’s a breakdown of the code
# Import necessary libraries
import os
import sys
import openai
from langchain.chains import ConversationalRetrievalChain
from langchain.chat_models import ChatOpenAI
from langchain.document_loaders import DirectoryLoader
from langchain.embeddings import OpenAIEmbeddings
from langchain.indexes import VectorstoreIndexCreator
from langchain.indexes.vectorstore import VectorStoreIndexWrapper
from langchain.vectorstores import Chroma
import constants

# Set your OpenAI API key
os.environ["OPENAI_API_KEY"] = constants.APIKEY

# Enable to save to disk & reuse the model (for repeated queries on the same data)
PERSIST = False

# Check if a query is passed as a command-line argument
query = None
if len(sys.argv) > 1:
    query = sys.argv[1]

# Create or load the index
if PERSIST and os.path.exists("persist"):
    print("Reusing index...\n")
    vectorstore = Chroma(persist_directory="persist", embedding_function=OpenAIEmbeddings())
    index = VectorStoreIndexWrapper(vectorstore=vectorstore)
else:
    # Load text data from a directory
    loader = DirectoryLoader("data/")
    if PERSIST:
        # Create and save the index to disk
        index = VectorstoreIndexCreator(vectorstore_kwargs={"persist_directory": "persist"}).from_loaders([loader])
    else:
        # Create the index
        index = VectorstoreIndexCreator().from_loaders([loader])

# Create a ConversationalRetrievalChain with the ChatOpenAI model
chain = ConversationalRetrievalChain.from_llm(
    llm=ChatOpenAI(model="gpt-3.5-turbo"),
    retriever=index.vectorstore.as_retriever(search_kwargs={"k": 1}),
)

chat_history = []
while True:
    # If no query provided, prompt the user for input
    if not query:
        query = input("Prompt: ")

    # Exit loop if user types 'quit', 'q', or 'exit'
    if query in ['quit', 'q', 'exit']:
        sys.exit()

    # Get the response from the ChatGPT model
    result = chain({"question": query, "chat_history": chat_history})
    print(result['answer'])

    # Append the user query and model response to chat history
    chat_history.append((query, result['answer']))
    query = None  # Reset the query to allow the loop to prompt for new input

Explanation
Libraries and Environment Setup
- The script imports required libraries from the LangChain and OpenAI packages.
- The OpenAI API key is set as an environment variable for authentication.
Index Creation
- The code checks whether to persist the index to disk for reuse or creates a new one.
- It loads data from a directory using
DirectoryLoaderorTextLoaderfrom LangChain and constructs a vector index.
ConversationalRetrievalChain Setup
A ConversationalRetrievalChain is created, which combines a ChatOpenAI model with a retriever based on the vector index.
Chat Loop
- The script enters a continuous loop where it prompts for user input if no query is provided.
- It uses the ChatGPT model to generate a response based on the user’s input and displays the response.
- User inputs ‘quit’, ‘q’, or ‘exit’ to terminate the program.
Integrating ChatGPT into Your Platform
Once you’ve constructed the custom ChatGPT application, the next step is integration. Depending on your platform, integration methods may vary. For web-based platforms, you can use frameworks like Flask or Django to build APIs that communicate with your ChatGPT application.
Testing and Iterating
Testing your custom ChatGPT application is crucial to ensure its functionality. Engage with the chatbot across various scenarios, observe its responses, and refine the model if needed. Collect feedback to enhance its performance.
Conclusion
Developing your own custom ChatGPT application allows you to tailor conversational AI experiences according to your specific use case. By following this guide and understanding the steps involved, you can create a powerful AI chatbot that aligns perfectly with your platform’s requirements.
In conclusion, the possibilities with custom ChatGPT applications are vast, offering personalized conversational experiences to users. With this guide and the provided code snippet, you’re now equipped to embark on the journey of crafting your very own custom ChatGPT application. Happy coding!


